Thursday, October 31, 2013

I'm Becoming a Bag Lady...

I've been going through a bag making phase lately. There are actually a few MORE than the three I'm showing today. The great irony here is that I don't carry a bag, just my wallet...


First there was this little "lunch bag" made from Ayumi's tutorial here. It's a fantastic, easy to follow tutorial.  I used up some cute novelty fabrics I've been stashing since I got them out of the remnants bin.


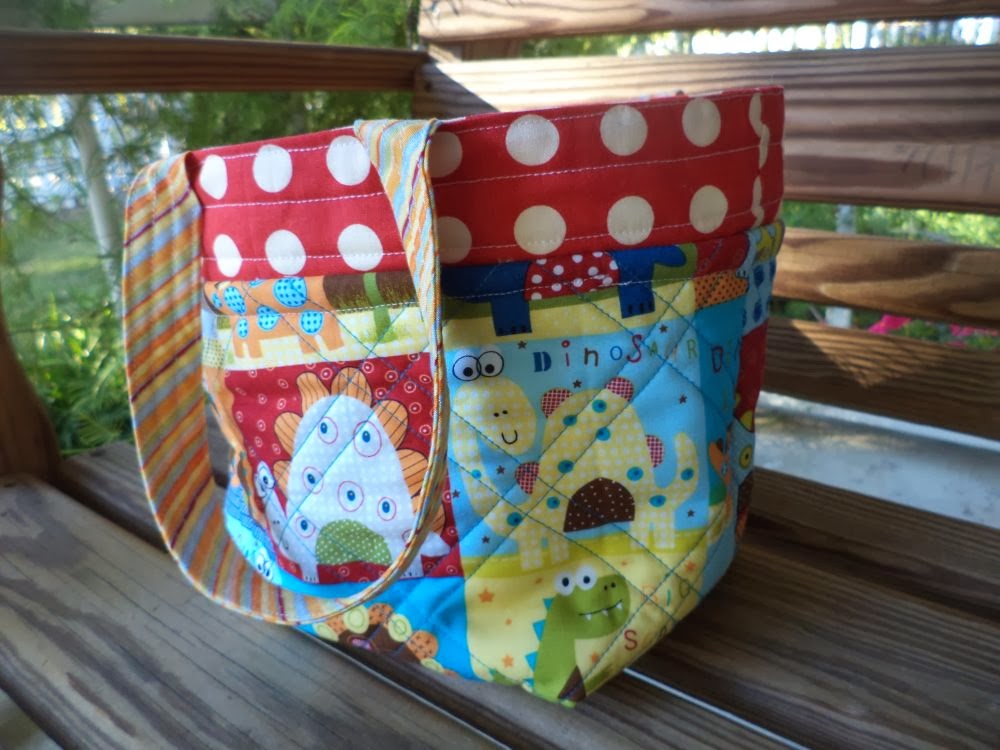
I made a few alterations. Mainly adding batting to the out layer of fabric and quilting it. If I'd had vinyl fabric for the inner lining this would have made a great kids lunch bag, with the quilted insulation.  I also used a layer of batting rather than stabilizer in the handles and trim (red dots).


After the lunch bag I decided to make the Cooper Carry-All.  The first bag I made essentially followed the pattern as written, with the exception of adding a zipper and some extra top stitching.


The bag finishes bigger than it looks in the pictures. It is essentially the size of a diaper bag (and would make a great one! Those outside pockets are perfect for bottles).  I love all the pseudo-binding trim, like in the handles and the top of the bag, that's made by rolling the lining fabric around the outer one.


Even with stabilizer, the inner bag (blue fabric) lacks stability and the whole thing is kind of floppy.  I'd imagine stuffing it full of baby stuff would solve this problem.  This bag has now been gifted to an expectant mommy.


After getting my head around the pattern I immediately made another version of the Cooper bag, this time making it my own.  I made it smaller, more purse sized. I added batting to the inner bag to eliminate the floppiness, and widened the base to improve stability.


I also made the straps longer so they could go over the shoulder, added an inner, lined, zippered pocket, and the zipper in the top.


I'm especially pleased with how the top zipper turned out.


I love these fabrics. The outer fabric is Laura Gunn, Cosmos, Daylilies in cream.  The inner, dark blue fabric is Lotta Jansdotter, Glimma, Kulla in slate.  For the inner lining and accent fabrics I used some greys and creams from my stash.


So there you have it: I'm officially a bag lady! As of tonight all of these have (finally) been gifted to people who will actually use them, but now I'm making messenger bags. Oi vey!

Linking up to Finish it Friday at Crazy Mom Quilts.

PS: Don't forget about the Blogger's Quilt Festival going on now. My entries are here (Baby Quilt) and here (Group/Bee Quilt).

Friday, October 25, 2013

Springtime Riot Bee Quilt {Blogger's Quilt Festival}

Hello! It's that time of year again, for those of us who only wish we were in Houston to celebrate the Blogger's Quilt Festival! This is my third time to participate. Thanks so much to Amy for hosting :)


I am entering Springtime Riot in the Bee quilt category.  I joined the Nurture circle of do. Good Stitches in February and working with these ladies has been the most wonderful experience!  The level of commitment and skill is far beyond what I had experienced in previous bees and most of all, it's just a lot of fun making quilts for charity.


Springtime Riot was my second quilt to design as the group quilter. Scrap quilts are my preferred style, and I'd been on a bit of a string quilt kick, so I designed this block for the group.


The finished quilt turned out better than, I think, any of us had hoped.  I loved seeing all the cute fabrics hidden in those busy blocks!


I quilted the quilt on my home machine with a loose stipple.  You can't beat a good stipple for fresh-from-the-dryer krinkle factor.


I opted to keep the binding low volume and machine sewed it down to both sides.  Our group donates our quilts to My Very Own Blanket, a charity the provides quilts to kids in foster care. So I wanted this quilt to be able to stand up to a lot of love and abuse.


A couple of the ladies in our group have confessed, after the quilt was done, that they had had doubts as they were making their blocks but were won over by the final project.  I think that is one of the best parts of bees: making something as a group that is greater than the sum of its parts.


The quilt got an appropriately riotous IKEA backing and a label under the binding before shipping out.


Thanks and major kudos, as always, to the ladies of the Nurture circle.  I can't wait until January when we start quilting again!


I am entering this quilt in the Bee quilt category of the Blogger's Quilt Festival. Be sure to check out all the entries. And visit my other entry in the baby quilt category here.

Thursday, October 24, 2013

"Winter Song" Baby Quilt Finish! {Blogger's Quilt Festival}

Well, it's that time of the year again when all of us who can't go to the Quilt Festival in Houston celebrate online.  That's right, it's the Blogger's Quilt Festival hosted over at Amy's Creative Side. This is my third time to participate. Thanks Amy!


Now, I know that the idea of the festival is to look back over the quilts you've made in the past 6 months and choose the ones that you want to celebrate, but honestly, this little quilt I just finished is my favorite I've made in a LONG time.  I am in love with this little quilt.


This baby quilt was made for a friend of my mom's who is expecting a Christmas baby.  I decided to call it "Winter Song" after the wintery icy-blues and creamy white. The inspiration for this quilt started with two fat quarters of these great Lonni Rossi fabrics. Wonderful, soft, natural colors and patterns.

I went back out in the evening to photograph the colors under a different light
The idea for this quilt came together after a night of surfing blogs.  I am indebted to the blogging community for the techniques that made this quilt so successful.  Some of it was stuff I had just seen, and some were things I had seen and been percolating in my mind for a while. But when it all clicked, I knew just how I wanted to use it all together.

The tutorial for the no waste geese is here at Pieceful Kwilter. I love making flying geese this way.


The pattern for the paper-pieced deer is here at Shape Moth.  If you haven't already been drooling over the gorgeous blocks made in the Forest Quilt Along get yourself over to their Flickr group and prepare to be stunned.

Ok, this one might be my favorite shot of the quilt.

I am not enough of a paper-piecer to do all 12 blocks, but including just one in this quilt added so much. Usually heavy quilting makes a quilt stiffer. Paper piecing is the opposite; it benefits from having the snot quilted out of it.  I knew as soon as I started this quilt that I would use this ultra-wavy quilting (best to try something that ambitious on a small quilt first.)


I think the wavy quilting helps to emphasize natural, outdoor-sy motifs in the fabrics.  It's a good thing I love it, because it too all. day. long. to quilt this tiny top. The tutorial for the technique is here at Better Off Thread.


For the backing I used 3 wintery color flannels.  Maximum softness for baby :)  And included my traditional label under the binding with the quilt's name and the year.

That ornate grey is one of my all time favs
The quilt finished at 36" x 43".  These little quilts are so addicting because I can do about one a week, and giving them away is so rewarding.  This quilt will be delivered soon to the expectant mom :)


Linking up to Finish it Friday at Crazy Mom Quilts and the TGIFF OctoberQuest2 at Quilter in the Closet.


I am entering this quilt in the baby quilt category. Be sure to go check out all the other entries and see my other quilt in the bee quilt category here.

Monday, October 21, 2013

Deer and Geese and Paperpiecing, Oh My!

Happy Monday! Rather unexpectedly, I have something on my design wall to share today! I was supposed to work all weekend, but on Saturday I got a welcome, early morning phone call.  Cancelled for the day meant a a bonus day of sewing :)


This sweet little baby quilt just needs borders, so I am hoping to get it quilted today.  I love the soft , but not girly, colors in the geese.


I have been watching enviously at the paper pieced blocks people have made during the Forest Quilt Along and decided to try just one for this quilt.  Whew, it was a lot of work!  I am in love with the results, of course.  You can't beat paper piecing for precision and detail.

Linking up to Patchwork Times Design Wall Monday.

Thursday, October 17, 2013

Finish: Cornered

Hello everyone! Happy weekend (for those of you who don't work weekends). It's a Friday with a Finish again!


For the past couple of weeks I have been working on a string scrap quilt using Film in the Fridge's Converging Corners tutorial.  What started out as a messy pile of string has become a finished, kid-size quilt.

The "before" picture
Not only does this great tutorial use up strings, it also perfectly features the small scraps of your favorite fabrics as the center squares.


I kept the fabrics boy-friendly.  This quilt is joining the Purple Kool-Aid quilt in my Emergency Baby Quilts pile.  I am trying to have a boy quilt and a girl quilt ready to go at all times and the last two have already been given away.

Some more sock monkey fabric.  I bought a 1/4 yd of that for my very first quilt and I am STILL using up the scraps.
All of the fabrics in this were scraps, including the whites. I used various shades of white, off-white, and muslins that I had left over.

LOVE that rocket fabric!

I opted for a quick all over stipple for the quilting. I always quilt string quilts densely because I worry about seams fraying.  Not to mention, the dense quilting gives texture to die for.

Quilting TEXTURE
The backing is what was left of a rainbow-stripe flat sheet that I have used for backing before.


I pieced a scrappy binding from the bits of binding left from other projects.


The quilt finished at 36"x48", perfect for a baby or a kid.

Elephants on parade in the strings :)
Linking up to Finish it Friday at Crazy Mom Quilts and the TGIFF OctoberQuest2 at Quilter in the Closet.


Ending with some parting shots. Can't believe the sun came out for pictures this morning after how dark and damp it was yesterday.

Those yellow sailboats are one of my favorite fabrics.
Enjoy your weekend, everyone!!


Wednesday, October 16, 2013

First Cold Day Sew-In

Today is a good day.  I'm off work and it's finally turned cold and damp outside. Feels like summer is finally over.  So it's the perfect day to stay inside and sew-- these string blocks are calling my name.  I hope to get this one done today.


Wilson demonstrates the proper rainy-day technique.


Linking up to WIP Wednesday at Freshly Pieced.

Thursday, October 10, 2013

Purple Kool-Aid: Scrap Quilt Finish

Hello and happy Friday everyone!  This week's finish is another quick scrap quilt I made in response to my overwhelming selection of scraps. I try to think of my scraps as a gift rather than a burden :P

You may remember a couple of scrap quilts I made back in the Spring and posted tutorials along with. I'm going to do the same with this quilt toward the bottom of this post. I'm calling this one Purple Kool-Aid!


The quilt is made from purple, turquoise, blue, yellow, and grey scrap squares.  I cut squares to 3.5" and 6.5".  I lucked out with some great fussy-cut squares that make the quilt so fun! Girly, but not too girly.  The final quilt measured 36" x 48".


I wanted to try out a new free motion quilting design so I chose loops in alternating sizes that I've seen several places. I used a turquoise thread that worked really well with the variety of fabrics. I love this FMQ design because it was so fast!


I assembled the backing from some "ugly" fabrics I've had in my stash a while. I don't like to call any fabric ugly; I really think that every fabric would be perfect in some quilt.  But I am just not a fan of that purple, no idea what I was thinking when I bought it.


I machine stitched the binding down to both sides. I already had the perfect stripe in my stash!  This quilt is going in my "Emergency Baby Quilt" pile until it's needed.


As far as how to go about making a quilt like this for yourself, here's how to go about it:

Step 1, pick a color scheme and a medium-smallish size of square that you think you can easily cut lots of from your scraps.  For example, 6.5" would not have been a good size for me to pick because I rarely throw anything into the scraps bin until it gets to less than 5".  I chose 3.5" for this quilt.  Good sizes would be 2.5", 3.5", 4.5".


Step 2, halve, double, and triple your size to get your alternate size squares.  This is slightly tricky because you have to deal with the seam allowances, but you're just trying to figure out what other sizes of squares compliment the one you have.  The way to do this is to subtract the seam allowance, do the math (halve, double, etc) then add the seam allowance back.

So for example. If you picked 3.5" as your base size.  3.5" minus the seam allowance of 0.5" = 3" Divide that in half = 1.5"  Add back the 0.5" seam allowance = 2"  Four 2" (unfinished) squares sewn in a four patch measure 3.5", the same as your base size.  Likewise, one 6.5" block would be equal to four 3.5" blocks in a four patch and a 12.5" block would be equal to four 6.5" blocks.  I made my quilt with only 2 sizes of squares, but you could use as many sizes as you like.


Step 3, dig into your scraps and cut as many blocks in your base size as possible, (or until you get tired of cutting). Also be looking for larger scraps to cut your larger alternative sized blocks from and smaller ones to cut the smaller sizes from. I recommend not counting or trying to keep track of blocks at this stage. Just cut as many as you can and once you've laid out your quilt you can come back and cut a couple more if you need to.


Step 4, start assembling your blocks into two patches and then four patches. Combine four by four units made from smaller blocks with the bigger blocks to make larger and larger patches.  (Four 3.5" blocks = one 6.5" block, etc). I chose to assemble my blocks into 12.5" square patches and then assembled those into the quilt top.

Here is where, if you find that you are one block short of making a four patch from on particular size, you can just go cut one more.  Make the largest quilt you can (or make two smaller quilts) and you're done, no counting no measuring!

I'm linking up to Finish it Friday at Crazy Mom Quilts and the TGIFF OctoberQuest2 at Quilter in the Closet.


PS- if you are a scrap quilter go check out the 3rd Annual Scrap Challenge and link a finish by the 15th!